This non-typical commissioned beaded skull art piece is named The Preacher. This deer came to me already named because of his large brow tines resembling praying hands. He is the last of a trio of whitetail bucks I have had the honor of reviving into beaded art, including The Boss and Stormy Knight.
The Clay Process
The Preacher had a few missing parts including a tooth and a large “bump” between his antlers which is not unusual with large deer. The tooth took a little time to reconstruct but all in all it was a pretty straight forward clay process.
The Beaded Art Design for The Preacher
Because this was the third skull in this commissioned trio, I wanted to bring in elements from The Boss and Stormy Knight yet still make The Preacher unique. So, I used The Boss’s dark chocolate paired with Stormy Knight’s deep reds. The focal points of the first two pieces incorporated large fan beads in different colors. As gold was also used in both of The Preacher’s companions, I wanted to make that central in this design. However, I could not find fan beads in color that suited this scheme so I switched it up creating the focal point with golden Swarovski Crystal teardrops framed in by round smokey quartz. I incorporated some of the same lines and shapes as with the first two pieces and from there let The Preacher do The Preacher’s thing with Riverstone and plenty of Swarovski bicone and flatback crystals. His “prayer hands” antlers definitely made things challenging at times but he was well forth it in the end.
It was a pleasure creating these three skull art pieces and hope I have an opportunity to coordinate pieces like this again in the future.
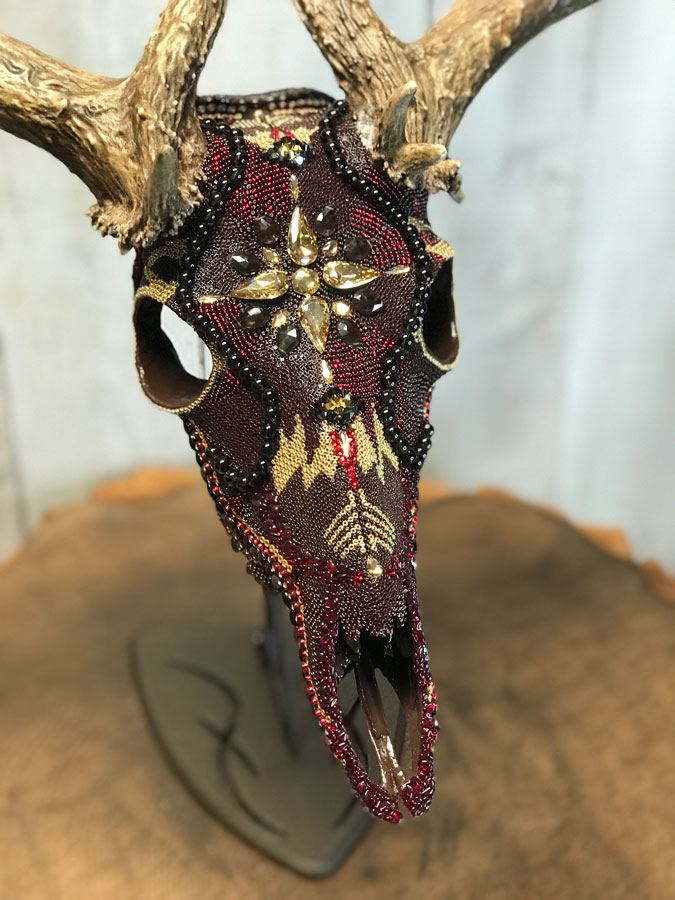
Thor is an outstanding non-typical whitetail deer beaded skull art piece. Are you a fan of the Old Norse red-headed god or the golden-haired Thor of Marvel® fame? Either way he speaks of physical and moral strength and power.
At the center of this beaded skull art design are three diamond shapes made of tiny Siam Swarovski® crystals surrounded by Black Onyx fans and teardrops. This large focal center piece is outlined by brecciated jasper and fire-polished faceted jet-black glass beads. Giving the eyes an aura of fierceness are ruby red and opaque black glass beads. And small groups of light Siam flat back, Swarovski® crystal rhinestone called Xirius add unexpected flashes of red. Theses dazzling crystals are named after Sirius, the brightest star in the sky, fitting perfectly with the theme of this majestic beaded skull art piece.
The Making of “Thor”, a whitetail deer beaded skull mount
Cleaning & Clay
This beautiful non-typical whitetail skull came to me in pretty good shape. Only missing common little bones and discolored. He did, however have some odd bone growth between his eyes. Probably from previous wounds. It was obvious from broken tines that he was a fighter! I definitely expected extra work during the clay process.
Despite bone formation on his forehead the clay process did not take any longer than usual. And his antlers cleaned up fairly well.
I learned how heavy that “hammer” on his right antler is. It made the balance awkward and it got by head a couple of times before I sorted out how to place him while working. Not the first Whitetail that has happened with, so no big deal.
The forehead area was going to need some extra clay work.Antlers cleaned and clay complete.
Paint and Antlers
I wanted the paint on this skull to have a metallic feel, sort of like armor. But the god of thunder wouldn’t have just any armor. It had to have a little more pizzazz. So first I painted it gold and went over that with a thin layer of metallic bronze. That left the gold peeking through a bit, giving it just a little sparkle. I darkened up the antlers as well as they were still a bit discolored in places and were too light for this color scheme.
Thor painted and ready for beading.
Bead Selection and Process
Rather than using one bead as the focal point for this beaded skull art piece, I decided to do something very different. I chose a black onyx “fan” set and teardrops and arranged them the full length down the center of the skull. Then used over 150 tiny Siam Swarovski® biocone crystals to create three diamond shapes inside (not shown here).
This was a complicated design. Therefore, as you can see, I did not try to lay everything out beforehand. I took some measurements and proceeded slowly and meticulously to ensure everything lined up just so.
I also used several unusually shaped beads in this design. Some I knew where I wanted them to fit in, others I let find their place as the designed progressed.
A large focal point design was used.
Sealing and Naming
Sealing the antlers gives them a little shine. However, for this beaded skull design I wanted them to appear more rugged so I chose not to use the sealant on them.
I sealed the smaller glass beads but left the onyx and faceted beads natural. The sealant can cause those beads to lose a bit of their luster.
The right side of his gorgeous non-typical antler shape immediately struck me as a “hammer”. I had wanted to use red and black beads on my next skull. Since, in Old Norse Thor is described as red haired it seemed only natural to name him for the hammer-wielding god of thunder. However, in Hollywood he has golden hair. So, adding some gold to his design seemed a good modern compromise and added a nice pop of color.
Legends say Thor is the fierce eyed, iron gloved god of not just storms and lightening but all weather, associated with the protection of mankind and fertility of the land. Strong in character, body and morals Thor is the good guy.
This is not a large whitetail buck. However, he is a VERY important one. Not to just one person but to an entire family. And the most important beaded skull art piece I have ever had the privilege of creating.
This buck is in memory of Devon Kurzhals. He was a very loved young man who was taken from this world too soon. His father and he were especially close hunting and fishing buddies. And this is the last deer Devon took on his grandparents’ property.
Only once before have I named a beaded skull art piece before I started working with it. But this is the first time one has been named before I had even held it. Before getting Devon’s buck from his father my husband and I were talking about Devon’s story and his family. And my husband thought of a name that made us both tear up. However, this is such a special situation I wanted to make sure his family would approve. When we met David, we asked what he thought of the name and I will never forget his smile.
This is “Devon’s Legacy”.
Getting started
To get started, as with every skull I work with Devon’s buck got a bath. However, there was just a bit of debris in some deep crevices. David did a great job taking good care of him.
He had lost a couple of teeth but David found some replacements in the “treasures” he keeps and glued them in before I got him. Nice job David!
There was very little to clean on the outside of his teeth. So it only took an hour or so to pick the debris out.
Before cleaning
After cleaning
Ready to start the clay process!
Clay Work Process
Clay work is coming along nicely. I was happy the small bones in front were just loose and not missing. Therefore they secured in place very well.
Before beginning the clay process.
After left side clay work.
The left side is finished save a few spots I will blend in as I work with the right. In this case it was necessary to use some clay below the antler base as there was a bit of cracking. And so I’ll do the same on the right side.
Left side clay finished.
Right side started.
The cartilage in the eye sockets is always cracked as it is very delicate. Therefore it breaks easily meaning more clay work. However, Devon’s Legacy is gladly cooperating and nothing has broken. Strong young buck.
I’ll post more images when the clay process is complete.
Clay Update
Finished with clay! Well, almost. The center needs to be fitted to the focal bead when it arrives. I have already started “flattening” the area so it shouldn’t take much to complete.
I painted the inside cavities before finishing the underside clay. So, while waiting for the that to dry I worked on the antlers. To address the discoloration, since they were on the whiter side, I had originally thought to simply give them a white-wash. I started that process; however, it didn’t take long to change my mind. It would have taken more white than I liked to cover some blemishes and I kept thinking of the chosen color scheme. This was not going to work. So, I washed the white-wash off.
Right side clay finished
underside before clay
Underside clay complete
After Devon’s Legacy and I sat together for a while, I decided to start with a light tan and medium brown. That was better but still not quite right. So, I added a bit of deep brown and that was the ticket. Now his antlers will blend just right with the color scheme.
Next up, paint! Although I won’t be able to finish until final claying is done for the focal bead. But I can get started.
Clay finished and antlers painted
Final Clay/Paint/Focal Bead
So grateful the beads arrived with only a couple of days delay compared to “normal times”!
With the focal bead in hand I finished the clay work and painting as quickly as possible. Though still taking enough time to allow everything to dry properly.
Ready to start designing this layout!
Ready to start beading!
Bead Design
Before the beads arrived, I had several thoughts in my head for this design. But from experience I know things change depending on so many factors including the skulls’ dimensions, the size and shape of the focal and other beads selected and, most importantly the FEEL of the project.
I was so excited when they arrived because this color scheme is amazing! I started by laying them out side by side in different successions against the beautiful focal bead. And I found three colors I loved the balance of with it. Perfection!
Then I tried all kinds of layouts I’d had in my head before getting them. Why, I have no idea because in the end I came right back to the way I’d laid them out when I first got them. This is definitely a “heart” over “head” project! I’m listening now, Devon! Moving on to laying out the design on the skull. Doing this helps me envision how it sits on the skull and where other beads will fit in. And then the exciting part of this beaded skull art piece…the beading begins!
Initial bead layout
Beading Process
In this first image you can see how I start this process by placing the beads for the main design layout onto a temporary “pattern” on the skull. I don’t attempt to add all the beads here, just enough for me to get an idea how they will sit and where other beads will fit in according to their shape, size and/or color. Because it is a very rough visual representation of the design at this stage, it is difficult for others to see where I’m going with it. But in my mind, I see much more. Sometimes I have to put more beads on than other times to get the “vision” I need. This time it didn’t take much.
Main bead design layout.
I was going to show an image of Devon’s deer with the design just to the point of the first image but changed my mind. I really wanted Devon’s family to see the main design as I “saw” it in my mind. The only thing that changed was I moved the line of tiny dark blue beads to the other side of the skull.
I still have a bit to do on the main design on the back and sides of the skull, though it wouldn’t be visible at this angle anyway. Then it’s on to all the details, which is the time-consuming part. So, Devon’s family, this is going to take a while. Please know I’ll be working diligently to get this precious skull back to you as quickly as possible. I’ll let you know just as soon as Devon’s Legacy is finished.
Initial main bead bead design for Devon’s Legacy is complete.
“Devon’s Legacy” is complete!
“Devon’s Legacy” is finally complete! And my husband and I had the great pleasure of delivery him safely back to David, Devon’s dad and Grandma Jean (Devon’s paternal grandmother).
Before saying anything else I want to say how much I appreciated the opportunity to meet in person Grandma Jean, who came wearing her signature turquoise. Love it! I SO wanted to hug her, but in the current circumstances that contact had to unfortunately be restrained. However, I got to see her face and smile and feel her energy and love for Devon. So thankful we met, Grandma Jean! Maybe we’ll still get to hug one day.
Grandma Jean and dad, David with “Devon’s Legacy”.
The image here does not do “Devon’s Legacy” justice and I am excited that professional photos by Byran Bosch (find him on Facebook at https://www.facebook.com/Photography-by-Bryan-Bosch-234421813426482 ) are on the way! Because of Devon’s and his family’s love of the outdoors, I had these photos taken outdoors in a woodland setting. As soon as I am able, I will create a page on my gallery with many of the images displayed here in the “The Making of Devon’s Legacy” section as well as the professional photos.
And that would normally be the end of this story…happy clients, happy life, right? But it was not the end for me.
Leesa with David and “Devon’s Legacy”.
As we drove home after delivery “Devon’s Legacy” to his family the thought struck me that I would never see that deer again. My eyes suddenly welled up and startled, I shook off the thought. I’ve never had that thought or that feeling of sad separation before with any of my artwork. Later that evening it returned to me and I allowed the thought and feelings to linger. As a lump formed in my throat and tears came to my eyes something very profound struck me. It was not about the deer. It was about Devon. Whatever loss I felt, the small tears that I shed were but a literal drop in the bucket to the monsoon of tears this family has shed and the life constricting emotions they have felt for the loss of Devon.
Dear Devon’s family, I pray this small piece of Devon’s life, that you have given a “new life” to brings happy memories to you all for many, many years to come. Thank you for allowing me to be part of your and Devon’s journey here, and beyond.
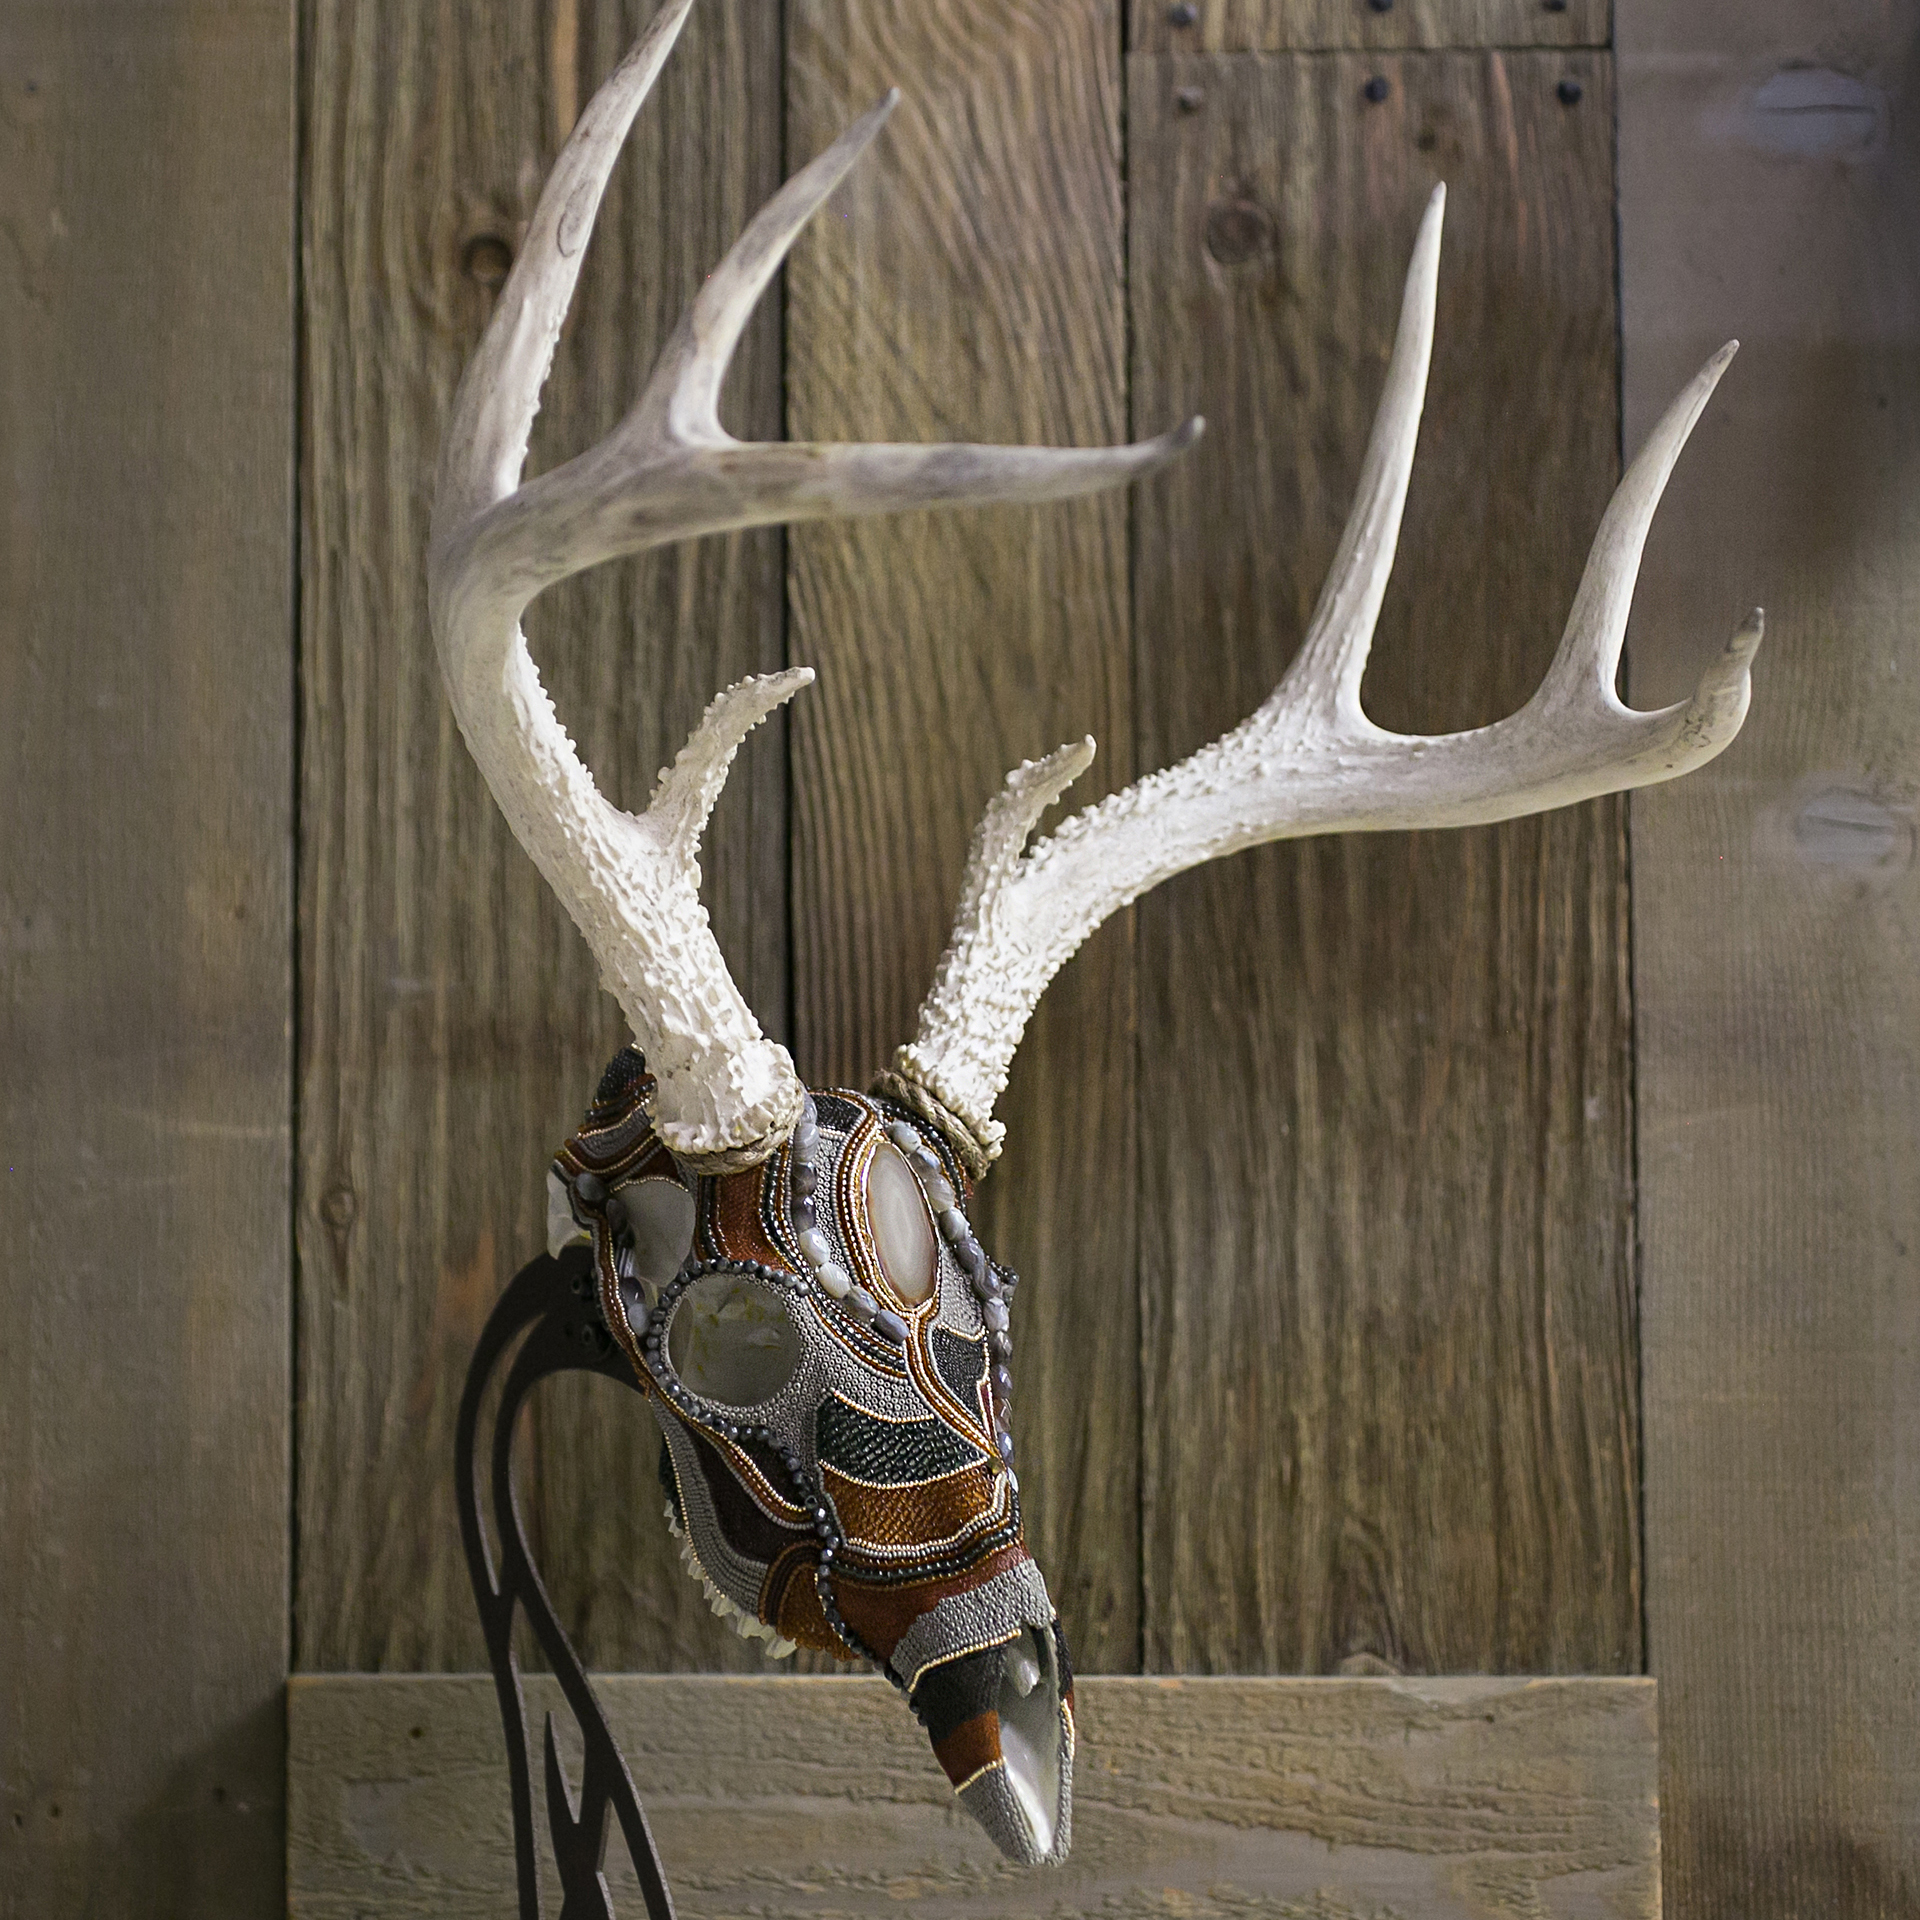
Mysterious is an artful rustic-chic style taxidermy alternative of a whitetail deer buck. He features an understated neutral palette with subtle intricate details that unfold with closer observation. Just as it’s name implies, Mysterious is never obvious or simplistic.
Inspired by a brown and gray agate slice encircled with gold metallic, grey Czech, and brown seed beads flow down and around its center, their movement splitting around the lovely agate centerpiece. Dark brown and smoky black are added to brown and gray patchwork areas, some more delicate than others adding depth and contrast defined by lines of gold. Natural blue labradorite with a chatoyant grey-blue flash outline the outer eyes and sides while natural jute encases his antlers. Two bronze diamond faceted beads at the back and fore enhance the central line of the design. Faceted barrel beads of natural Botswana Agate, running up and down the center are as important to the design as the central Agate slice itself. His sleek design and neutral colors are a perfect example of a rustic-chic taxidermy alternative.
Metaphysically these stones are thought to help with attentiveness to detail, consistency, perseverance, and stimulating exploration of the unknown. The colors, lines, curves and details of Mysterious provoke different images and thoughts for everyone. Are the metaphysical attributes of Agate real? This is a mystery for you to decide.
Continue reading below to see the making of Mysterious.
This whitetail buck required quite a bit of cleaning. He had obviously sat out in nature for some time before being taken in. Both nasal bones were fortunately still with him (barely) although they inevitably fell off during this process. The even light coloration of his antlers both impressed and mystified me. I haven’t seen that often, especially in a buck in his condition.
Mysterious after being thoroughly cleaned.
Clay
I initially considered leaving his upper nasal bones off, as I did with Ancient Warrior but that didn’t seem to suit this piece. During this part of the process I lovingly nick-named him “Topsy Tervy”. His skull was so light and antlers so heavy that he constantly tipped over without support. I fell in love with the shape of his antlers. But those antlers gave me quite a few “love taps” on the head! Along the way of the clay process he became more and more stable, especially after reintroducing the nasal bones.
Mysterious after the clay process.
Paint
I chose a very pale gray for this piece in order to keep with his neutral color scheme. I liked that the color was very close to the that of the natural skull tone. Staying with that theme, the jute used around his antler bases was also kept natural.
Mysterious painted and ready to begin beading.
Bead Selection and Beading
Oops! I was so excited about this bead work layout and how well it came together that I forgot to take any pictures of the process! I was already to this stage when I finally remembered. But I do think it is a good example of the process underway.
A complicated design comes to life with the right bead selection.
Naming
At first, working with this skull and these beads I had thoughts of a dry riverbed or a rivers edge. But the central flowing line seemed like a path or was it a map? The night I finished beading him I showed my husband. He held him, turning him this way and then that to take everything in. Finally he said, “He looks so…mysterious.” I got goose bumps and my mouth fell open! Of course! Mysterious he is.
Sometimes it takes someone else’s perspective to find the right name.
Blue Moon Shadow is a regal Whitetail beaded skull art mount. Sparkling tiny crystals and a dark blue metallic finish coat the hand-cut rough-face druzy agate centerpiece. Czech diamond-shaped bronze beads encompass the centerpiece’s rustic trim.
From there this Whitetail beaded skull art design transitions into a diamond shape that consists of bronze faceted, navy seed beads, blue Swaroski crystals, and Swaroski dark lapis pearls. In essence, Blue Moon Shadow mimics the dynamic night sky. As the pattern morphs from the center, its colors remain consistent, but with larger dark blue rainbow, sapphire rainbow, gold, and black smoke seed beads. Finally, hand-painted royal blue jute dress the base of his antlers.
With his deep hues, sparkles, and graceful form, Blue Moon Shadow conjures up many feelings, thoughts, and inspirations. What does the Blue Moon Shadow speak to you?
Continue reading below to see the making of Mysterious.
The Making of Blue Moon Shadow, a Whitetail Beaded Skull
Cleaning
This lovely skull came to me with his left nasal bone missing. I soaked and scrubbed as normal and then had to face this obstacle. Should I break off the right bone or take on the challenge of recreating the left? And then there was the odd coloration lines on his antlers. I’m guessing this skull was boiled rather than the more natural beetle process of cleaning though I can not say that for certain. Either way, both the nasal bone and antlers would be faced in other parts of the process.
After the cleaning stage decisions need to be made.
Clay
I just could not bring myself to remove the right nasal bone and so took on the challenge of recreating the left. Being the first time I’d attempted such a reconstruction I was pleased with the outcome.
For some reason I felt very passionate about this skull. It was not the antlers that struck me but the skull itself. I had not even started to bead him and he was already my favorite so far in my skull art journey.
This skull felt special and new challenges were taken on for him.
Painting the Antlers
Normally, if I’m going to paint the antlers I do it as part of the painting process. Sometimes I even wait until the beads are complete to have a better idea what shade works well with the design coloration. But I couldn’t get past the discoloration lines and decided to paint the antlers even before I’d chosen beads for him. A little out of order but I was never sorry about the decision.
This time, painting the antlers early in the process worked well.
Bead Selection
I had originally intended to use the gray agate slice on this skull and this blue druzy agate on another. However neither would sit right on the skulls. So I tried switching them and…Voila!
Now that I knew he wished to be blue, I set out laying out the initial design. It became obvious early on that rather than having a larger area laid out, this design idea was one I just had to go for and allow to evolve.
This skull chose to be blue and its design needed to evolve in its own way.
Paint
To enhance this particular Whitetail beaded skull design, I painted him the same deep blue of the druzy agate centerpiece.
After cutting the jute for his antler bases I felt like the natural color would detract from the design. So I painted it deep blue as well.
The whitetail skull painted a deep blue to match the druzy agate centerpiece.
Naming
I hadn’t even finished beading the center design when I knew his name. Blue Moon Shadow. He’s like a gentle night in the woods with the moon peaking between the tree limbs and stars twinkling in the dark sky. He surrounds you with blue-black shadows and pinprick sparkles. I love it when someone sees him in person and comments with amazement how some of the tiny beads sparkle and look like stars. Confirmation that the design conveys the right message and his name is very fitting.
His name was obvious from the very beginning. Blue Moon Shadow.
Ancient Warrior is a whitetail deer beaded skull art piece. He features five teardrop red tiger eye stones. Gold rocaille, Czech bronze, diamond faceted, and copper seed beads all border these stones and form a central cross. Leather insets and an array of brown and black seed beads complete a rustic-chic design. Organic round wood beads adorn his antler bases. All of these components move together in striking unison to portray a primal fighting spirit.
Humans evolved from gatherer/hunter to defender/warrior while other species, like the deer, have stayed ever true as the “pure” warrior. He was born to defend his territory, breeding rights, and stand his ground against his own species and predators, two legged or four.
Ancient Warrior is not for sale as he remains part of the artists private beaded skull art and taxidermy collection.
Although this piece is not for sale, if you have your own skull, European, or shield mount, whatever the species, Leesa can craft it into a one-of-a-kind artwork centerpiece for you. Contact her at Leesa@UntamedElegance.net or 616.422.2342.
Grand Chaos is a fun and fascinating Steampunk beaded deer skull art piece. A copper color scheme, wires, tubes and gears in addition to leather inserts further his classic mechanical Steampunk vibe. With this genre in mind he sports a movable monocle covering a glass tube “eye” connected to gears by copper wires.
Brown leather surrounds the base of his antlers enhancing the “wild west” flare. Likewise aged copper inserts, hinges and a keyhole, as well as the classic skeleton key continue the Steampunk theme. His mechanisms are intricately designed from a combination of gear focals, tiny watch parts, screws and antique brass and copper plated beads.
Everything about this Steampunk beaded deer skull leaves to the imagination the purpose of each gear and how it all works.
Continue reading below to see the making of Grand Chaos.
I’ve dedicated this Steampunk beaded deer skull piece to Benj Spencer from Pixel Ink Frame as he suggested the Steampunk art idea while working on my logo and website.
I love Steampunk and immediately knew which deer skull in my current inventory I wanted to use. The fact that he is a smaller skull with a damaged tine and missing teeth made him just the sort of rogue I envisioned for this piece.
Benj is so creative and I had several insights working with this buck. I am grateful for the journey I have had with them both.
The Making of Grand Chaos, Steampunk Beaded Deer Skull
Cleaning
I have no pics of Grand Chaos prior to the clay stage due to the frantic pace this piece started with including the mid-holiday season, out-of-town family coming and preparing for my first photo shoot. In hindsight I should have already had a clue to his “name”. I wish I had taken pics of his initial rugged state.
Clay
The majority of clay work on this whitetail buck skull was nothing out of the ordinary, until it came to his underside. Although it will rarely be seen, it was so deteriorated and split it degraded the integrity of the entire piece. His left upper nasal bone was broken off but this is not unusual and I reattached it with glue and clay.
Paint
On this Steampunk deer I wanted to try a new copper sheeting as well as a different type of paint available in the perfect copper color. I mean, what could go wrong using two new elements in a time crunch? And also starting with a totally different focal point design? Initially the paint and copper did not agree with my glue at all. However, after some practice I did manage to get them to all play nicely together.
Bead Selection
While all of the Steampunk mechanisms were important to this design the eye was the key. Specifically the mechanical connections and monocle were the true focal point of this piece. Starting the design around an eye rather than the center of the skull was also a new idea for me.
I had no time to physically layout the complicated design on the buck skull due to the photo shoot. Instead I started with the simpler design on the opposite eye. Indeed, everything about his beginning felt very chaotic. All the same, it all came together beautifully and was a lot of fun to create.
Beading
Although the beading design I’d envisioned was not complete, for several reasons I stopped and sent photos to Benj for the site.
However, having seen all my other pieces he questioned some things about this one. I had not finished my vision and it showed. And so I replied:
“Since it is so different than my other pieces I got off track early by rushing with new materials for the photo shoot and then asking too many people for their opinions. I always show them to people throughout the process but with this one I started listening to people rather than the deer. I plan to finish the design the way I had originally planned, unless the buck has other ideas. Thanks for getting me back on track with my own art.”
This is where Grand Chaos comes to “new life”. Every piece has a story to tell.
Naming
The remainder of the design and coloring his antlers fell right into place. All that was left was a name and for the first time I struggled with naming a piece. I even resorted to looking up Victorian era and Steampunk phrases. Nothing fit. In honor of Benj Spencer I considered naming him “Benjo”, Victorian sailor slang for “A riotous holiday”. But, even though the era and meaning were spot on, this whitetail deer didn’t strike me as a sailor.
And so I sat down with him, considering our chaotic journey together as well as how beautiful he’d turned out. And I realized his name had been right there the entire time: Grand Chaos!
A fitting name is better and takes time, but is well worth the effort.